If you use Unity to develop your game and know about its scriptable objects you might know just how useful they are. If you don’t knot about them stop reading this, and read tutorials on them instead.
But basically, scriptable objects are little container classes where you can store “hard-coded” information.
What do I mean by hard-coded? Basically, it means that these assets will not change during run time, but instead they will just be read from disk. It is ideal in most situations because as they are read from disk, they won’t take up RAM resources during run time, because they aren’t expected to change over time. And most importantly, every SO is taken as a single instance. (So regardless of how many scripts reference it, they will all be referencing the same asset). Ideal for centralizing changes, and storing settings. (As these values aren’t reset when exiting run time, because again, they are on disk, not on RAM).
But you can read all about it in the tutorial link above.
Anyway, the little trick I wanted to show was that you can make all of the instances (assets) of a particular scriptable object share the same icon, instead of having the default Unity one, for a result like this:

How do you create and implement your own?
Basically it comes down to:
- Make your custom square .png icon – I recommend it being 16×16, so the image isn’t compressed or resized weirdly. (Here is a little tool that can help you make an icon out of a large square image.)
- Create a folder named “Gizmos” on the Assets folder. It CANNOT be anywhere else, it should give the path: “Assets > Gizmos”.
- And finally, store your icon in the Gizmos Folder and rename it so it matches the name of your scriptable object script + ” Icon” (mind the space). i.e. if the name of my scriptable object script is MyScriptableObject.cs or MyScriptableObject.js the .png name should be “MyScriptableObject Icon.png”.
Where the result should be more a less like this:
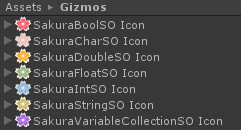
And boom, you might end up with something like what was shown above.
What is that of the images above^? It is just part of a framework I’ve been working on. Basically those are variables that save themselves, synchronize themselves, clamp themselves if needed and count with other customizable features on a per-variable basis. Neat huh?
But anyway, that is all for today’s tip.
And also, thank you very much for reading my blog 😀