Pimp Your Enums’ Elements In Unity

Enums, once you get to use them in unity once, you will always try to use them. Not only do they save confusion by avoiding having to use many boolean flags, but also help you tidy up your code and work amazingly well on the Unity inspector. If for some reason you never heard of them, do give yourself the time to research them.

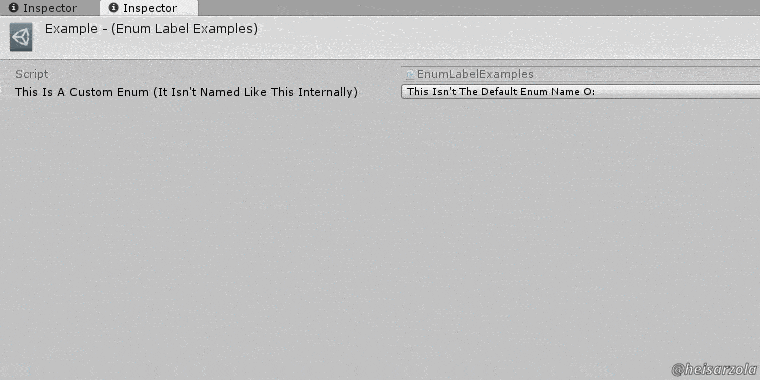
Taking the latter example however, there ARE limitations when it comes to how they appear in the inspector. Essentially speaking, the way you name an enum element, is how they appear on the inspector, separated by capital letters.

i.e. MyEnumElement becomes "My Enum Element" on the dropdown.
This isn’t bad by any means, but there are sometimes when you would prefer something cleaner, like:
GreaterOrEqual to appear instead as: ">=" in the dropdown would be easier to comprehend.
This is the reason this nifty little tool exists.


Download The Tool

Once the attribute is downloaded, simply add it before an enum element AND the enum instance.

Download it for FREE!


PLEASE NOTE: That without it on the enum instance, it WON’T work. i.e.:

public enum MyEnum
{
   [EnumLabel("Element #1")]
   ElementOne, 
   ElementTwo, // This one will appear normal ("Element Two")
   [EnumLabel("Element (2^31) - 2147483644")]
   ElementThree
}

// With no attribute, this one will not work with the labels from above, they will ALL appear normally.
public MyEnum myEnumInstance;

[EnumLabel("This Is How I Appear In The Inspector Now")]
public MyEnum myOtherEnumInstance; // This one will work with the above labels, PLUS it can have a custom inspector name.

Visit The GitHub Repository For More FREE Tools

You just read about one of several FREE tools that you can get on the Unity Development Tools Repository. Again, they are FREE so just go see them, there are neat things in there~

See all of the tools!

(And yes, I’m a big fan of DDLC)
That will be all for today~

But Like Always…

Thank you very much for reading my blog :3

Avoid Making Multiple Methods

Sometimes you require to pass a LOT information to a method of a given type, and you might’ve worked around it doing something like:

public MyMethodThatNeedsManyStrings(List<string> myStringList)
Which in practice might seem like the way to go, but on the long run it will involve you needing to create and populate a list before passing it to this method. Where another case might be that you NEED something like the following:
public SomeMethod(string firstString)
public SomeMethod(string firstString, string secondString)
public SomeMethod(string firstString, string secondString, string thirdString)
If you keep doing the parameter overflow like this, you can see how quickly it can become messy and hard to manage if you need to do this for, let’s say, 50 string parameters.

The premise might sound a little too specific, but it actually happens. It usually will involve you having different amounts of data to work with that you want to somehow connect in a central method:
public static class Printer
{
	public static void Print(params string[] thingsToPrint)
	{
		foreach (string s in thingsToPrint)
		{
			// By the way, DON'T concatenate strings like this in Unity* (see below)
			Debug.Print("Printing: "" + s + "".");
		}
	}
* (This generates unnecessary garbage, see this)

Try It Yourself Today!

As you can see, now this little Printer is capable of printing any number of lines according to the amount of string parameters given.

Read The Full Tip HERE

Get More Useful Tips On The GitHub Wiki

What you just read about was ONE of several programmer tips that are available on the Programmer Tips Wiki.

So if you liked the one you just read, be sure to check it out (or star it) as it gets updated often! 😮

Read More Programmer Tips!

I used the little params keyword to make my StringBuilderExtension, and been using it whenever I need to since, so I hope this tip comes useful for you as well.

This concludes today’s post, hope I was helpful today~

But Like Always…

Thank you very much for reading my blog :3

All In One Place

When testing a game for production, it is very likely that while you are at it you have open several different folders, browser tabs, and even folders.

And it is in Unity specifically, where one tends to visit the same folders over and over (such as Application.dataPath, among others), because these are the places where you usually store save files, or points to the root of the project.

It is specially tiresome to open repeatedly of something like Application.persistentDataPath, because we unconsciously closed said folder, or keep having to turn on and off hidden folders to find AppData. This is why this tool was created, to make your life just a little simpler.

It is important to note that the provided standalone tool, is part of a collection that came bundled with many others from the FREE AmLovey’s A+ Asset Explorer asset.

Download The Tool

Once in your project, you can immediately make use of the tool by going to the menu:
Tools > Quick Opener > (FOLDER_YOU_CHOOSE)

Download it for FREE!

Visit The GitHub Repository For More FREE Tools

You just read about one of several FREE tools that you can get on the Unity Development Tools Repository. Again, they are FREE so just go see them, there are neat things in there~

See all of the tools!

Hope that by opening a folder with this menu, you can feel a little more relaxed throughout your day. As that is the reason why it is being shared~

This concludes today’s post.

But Like Always…

Thank you very much for reading my blog :3